
Containers Sitting Around Doing (Mostly) Nothing
The Kubernetes Pause (Infra) Container through Beginner’s Eyes.

The Mystery of the Pause Container
If you peer under the hood of a Kubernetes cluster with a container runtime tool like crictl or Docker, you might be surprised to discover that there is a so-called Infra Container that is launched for every Pod in the cluster. This container spends most of its life after the Pod is created in a sleep or pause state, hence its other moniker, the pause container.
For example, on a playground cluster in my homelab, I have deployed the nginx-gateway as part of the gateway-api system routing external traffic to services within the cluster using the nginx implementation of the Kubernetes gateway api, the NGINX Gateway Fabric, which I wrote about in a previous blog post.

The pod for the gateway is running in the k3s-worker-02 node. If we connected to the node using ssh or similar protocol and list all pods using crictl, we can filter for the pods related to the nginx-gateway running on the node using `grep`, as below

The first column of the command output is the id of the pods. Using the ID of the nginx-gateway container, we can further inspect this container specifically with the crictl inspect command and grep for parts of the container config related to the word sandbox, which is how the container runtime interface describes the pause container.

And if we dig a little deeper, we find that the sandbox container is running the docker.io/rancher/mirrorerd-pause:3.6 container image, which is rancher’s mirror of the mysterious pause container, this being a k3s cluster.

The pause container serves as the “parent container” for all other containers in a pod. Though it spends most of its time sleeping and doing nothing, it serves two important functions; as the basis of Linux namespace sharing in the pod and serving as process with PID 1 that is responsible for reaping zombie processes.
To understand why we need a container that mostly sits around doing nothing to be part of every Pod, we will dig into the Kubernetes Pod model and establish the reason why all containers in a Pod share the same network namespace. Going further down one layer of abstraction, we will learn about what containers really are and how containers combine underlying linux kernel features like cgroups and namespaces to create (the illusion of) an isolated group of processes. If this sounds like fun to you, then buckle up and get ready to dive in!
First, Containers and the Linux Kernel
In the beginning, there were containers
A container is an abstraction that bundles an application and all its dependencies, isolating the application from the rest of the machine it is running on. The containerized application has everything it needs and it is easy to package up as a container image (a zip archive of a filesystem and configuration files) that will run the same on any machine. Kubernetes is an orchestration system for running containers.
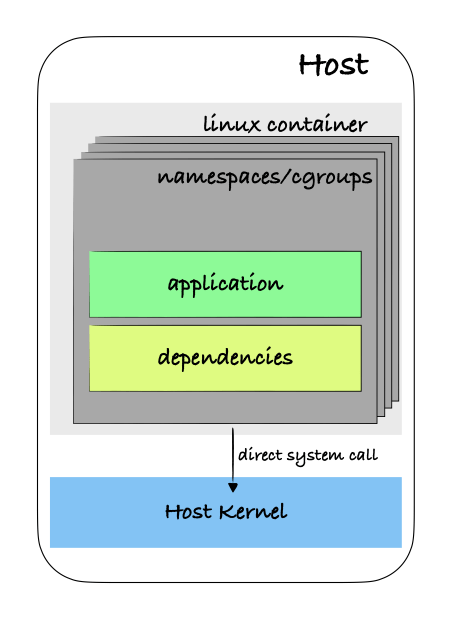
This classical definition of a container, while not inaccurate, offers little by way of explanation for what containers really are under the hood and what they are made from. For starters, there’s no such thing as a Linux container, really — Linux containers are not a thing! Rather, “containers” are nothing but normal processes that are executed using features of the Linux kernel, including namespaces and cgroups, to create a level of isolation from the underlying host. If you get shell access to the container and run ps you only see the processes that are running inside of the container and running ip a or similar command will show the container seeming to have it’s own network stack — network interfaces, ip address space, route tables, etc. All of this is made possible using Linux kernel features, including namespaces!
Linux Kernel Features We Should All Love: Namespaces
Namespaces are a feature of the Linux kernel that enable the partitioning of kernel resources. Namespaces allow you to provide a “view” to a process that hides everything outside of those namespaces, thus giving it its own environment to run in. This makes it so that processes can’t see or interfere with other processes.
Linux supports several types of namespaces, each designed to isolate a specific set of system resources:

Mount (mnt): Isolates filesystem mount points, enabling each set of processes to have its own set of visible filesystems.
Process ID (pid): Ensures processes in different pid namespaces see distinct sets of process IDs.
Network (net): Provides isolation of network interfaces, IP addresses, ports, and routing tables.
Interprocess Communication (ipc): Separates interprocess communication resources.
UTS (uts): Allows a single system to appear to have different host and domain names to different processes.
User ID (user): Enables the mapping of user IDs between the namespace and the underlying system, effectively allowing users inside namespaces to have different privileges.
Control Group (cgroup): Although not initially included, later versions of the kernel added cgroup namespaces to provide isolation of cgroup roots.
The Linux Network Namespace
The network namespace allows a container to have its own view of network interfaces and route tables. If we create a process in a new network namespace, it effectively has it’s own network stack that is distinct from that of the host machine. It will have its own IP address space and cannot communicate with the host by default, except when joined to the host’s network using a virtual ethernet interface or a virtual bridge.
To state it a bit more plainly, if you launch a process in a new network namespace, it is effectively isolated at the network layer from the host machine. It starts with just a loopback interface and can then be configured with virtual interfaces to communicate with the host machine, if so desired. To provide connectivity with the outside world, Network Address Translation (NAT) needs to be set-up alongside the virtual connection between the process and the host. That does sound a lot like the sort of network isolation we get with containers, doesn’t it? Well, that’s exactly what it is!
The figure below illustrates a container running in a separate network namespace and effectively isolated from the network namespace of the Linux host on which it is running. The container and the server will have distinct iptable rules and routes. Each will also have a separate loopback interface.

To demonstrate what this looks like in practice, we will experiment with launching a bash process in a separate network namespace on an ubuntu 18.04 virtual machine host in a playground environment.

Looking at the output of running lsns -t net command, there is currently only one network namespace on the host and that is owned by the init process with PID 1. To create a process in a new namespace, we use the unshare command and pass the —net flag to launch the process in a new network namespace.

The bash process now has it’s own loopback interface but has no other network interfaces defined. It also has its own iptable rules (currently empty), which are linux kernel IP network packet filtering rules. The bash process has no knowledge of the packet filtering rules defined on the host.

This process is isolated from the network stack on host. To establish connectivity, we need to create a virtual ethernet pair by specifying the namespace associated with the bash process.
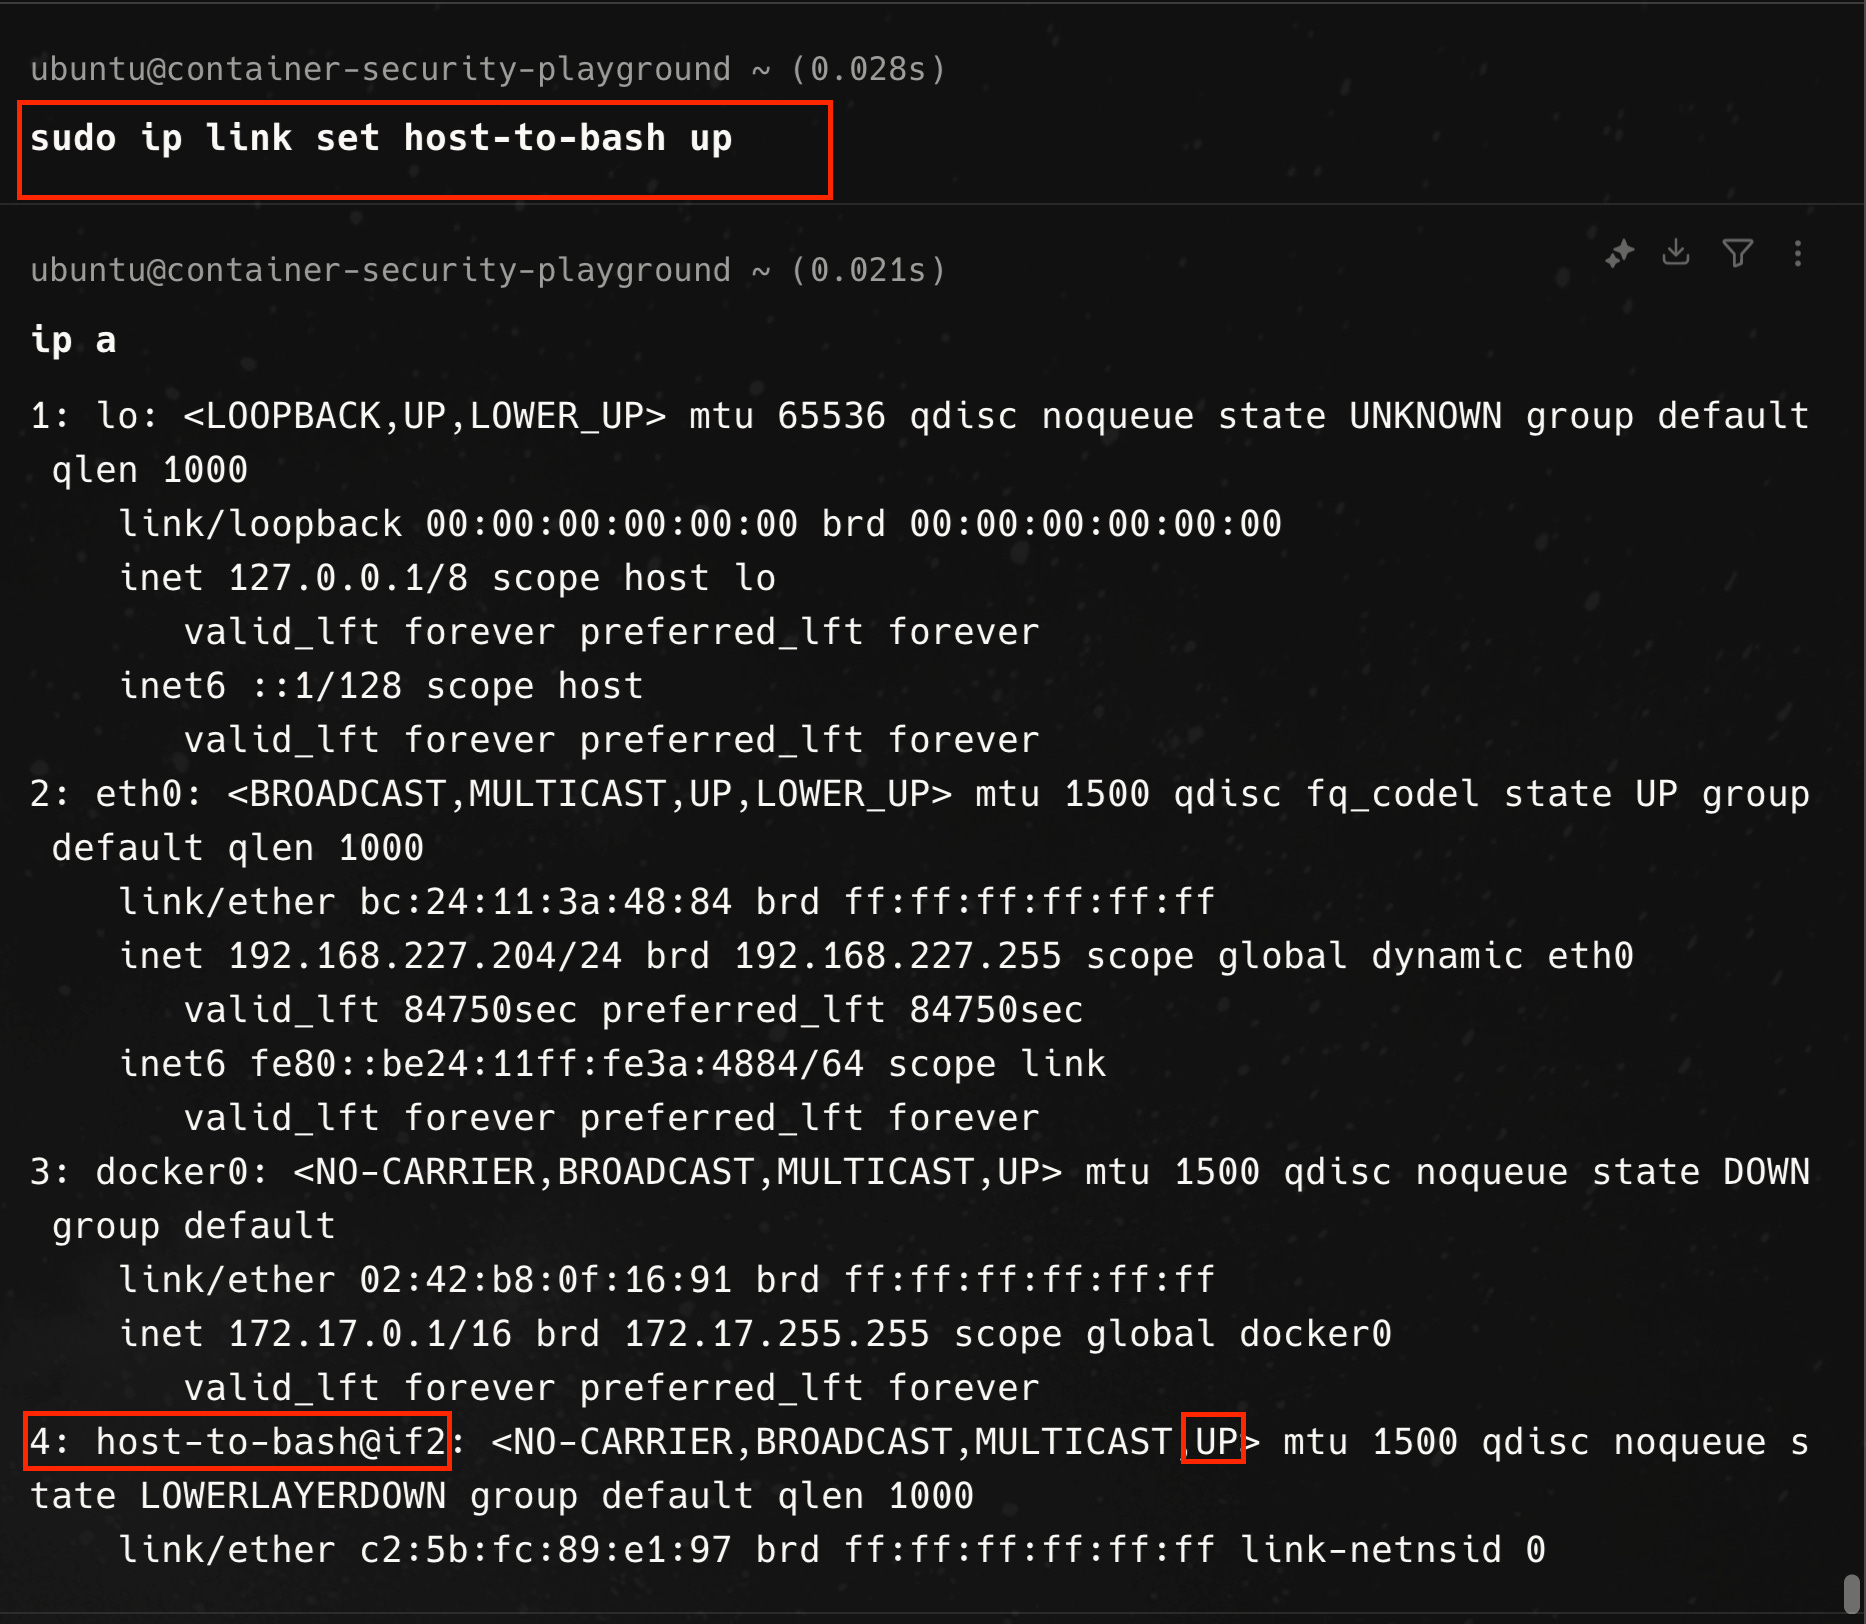
First, we create a virtual Ethernet pair from a separate terminal on the host, using the ip link add command. We specify one end of the virtual Ethernet interface device, named bash-to-host, to be associated with the process ID of the bash process and the other end, host-to-bash, to be associated with the network namespace of the init process (hence the host).

From within the bash process, we see that a second interface now exists, but is in the DOWN state.

We need to bring the interface on both ends UP.
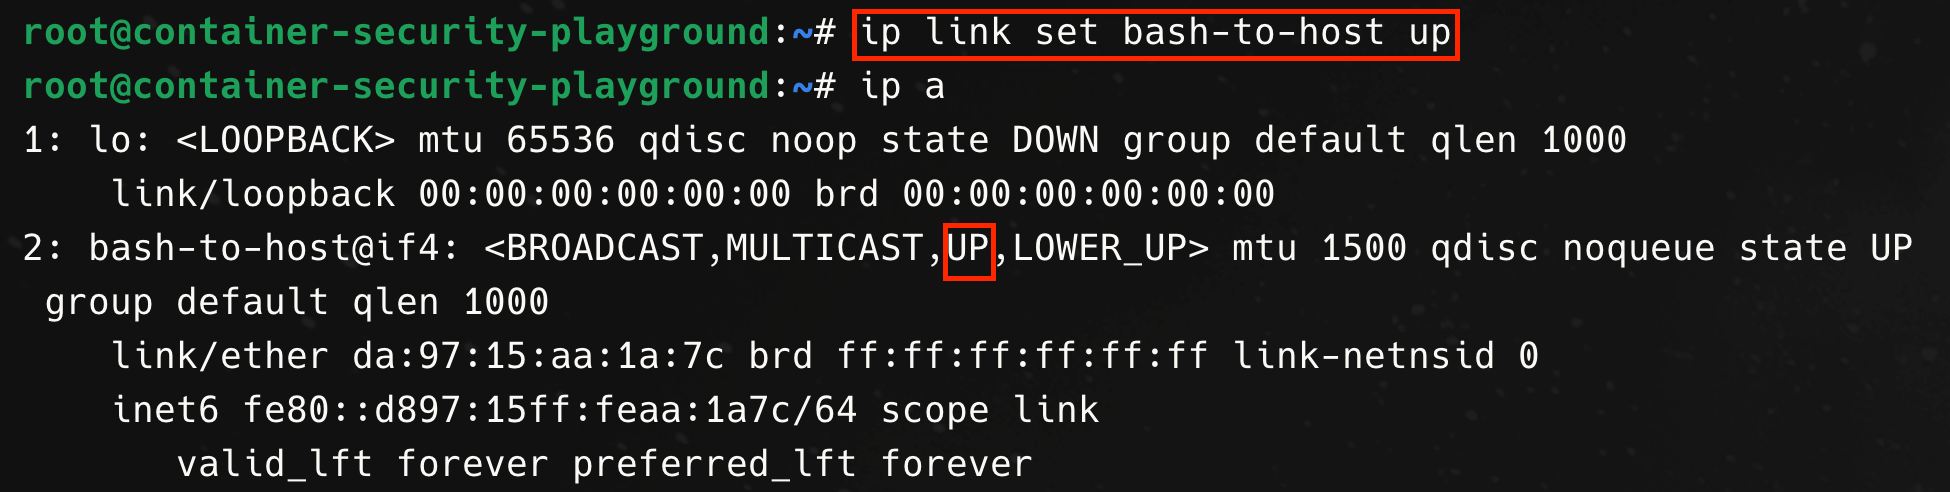
In the command output above, the bash-to-host interface on the bash process is now in the UP state.
Finally, to send traffic between the bash process and the host, we need to associate an IP address with the interface on both ends.


We are now able to send pings from the bash process to the ip address for the host machine and see that packets are being delivered.

Network Namespaces with Docker
To recap, Linux Namespaces allow the partitioning of system resources and give processes an isolated view of resources like CPU, memory, networking, users, mounts, etc. When a process is spun up in a different network namespace, it becomes effectively isolated from the host and would require a virtual Ethernet interface to enable communication with the host. We demonstrated this with our bash process, which we spun in a new network namespace and then configured a virtual Ethernet Interface and IP addressing to allow packets to flow from the process to the host and vice-versa.
The complicated song and dance we went through for our bash process is effectively what Docker does to isolate a container from the host at the networking layer when we run containers with Docker. In the example below, we start out with only one network namespace owned by the init process, then run an Nginx container with docker. Afterwards, we see a second network namespace has been created and associated with the Nginx container.
Containers & The Linux Kernel; The Full Story — Abridged Edition
So, here’s what we know so far. Containers in Linux are nothing but regular processes that use kernel features like namespaces to isolate from the host. With respect to the network namespace, in particular, the container runtime (i.e. the piece of software that actually runs your container, such as Docker, CRIO, etc) typically launches containers in their own network namespace to enforce network-level isolation between the contained process and the host. The contained process can still be connected to the host if the right parameters are passed, similar to how we connected the bash process to the network of the host using a virtual interface.
In addition to namespaces, containers also utilize a number of other kernel features to achieve isolation from the host. These include using cgroups to restrict resource usage on the host, using pivot_root to the set the contained process’s root directory to a directory within the contents of the container image, as well as using capabilities and seccomp-bpf to give specific permissions to the contained process and restrict the system calls the process can make.
When you run a container from an image, the container runtime unpacks the archive filesystem that forms the image into a directory and then launches the contained process or group of processes with their root directory as the unpacked directory location. Using these aforementioned kernel features, the contained processes are isolated from the rest of the host in terms of the network, what processes it can see, the filesystem it can access, the defined users and groups, resources it can consume on the host, etc. To truly understand how containers works, it is vital to think in terms of the underlying kernel features with which containers are implemented.
Sharing Namespaces Between Containers
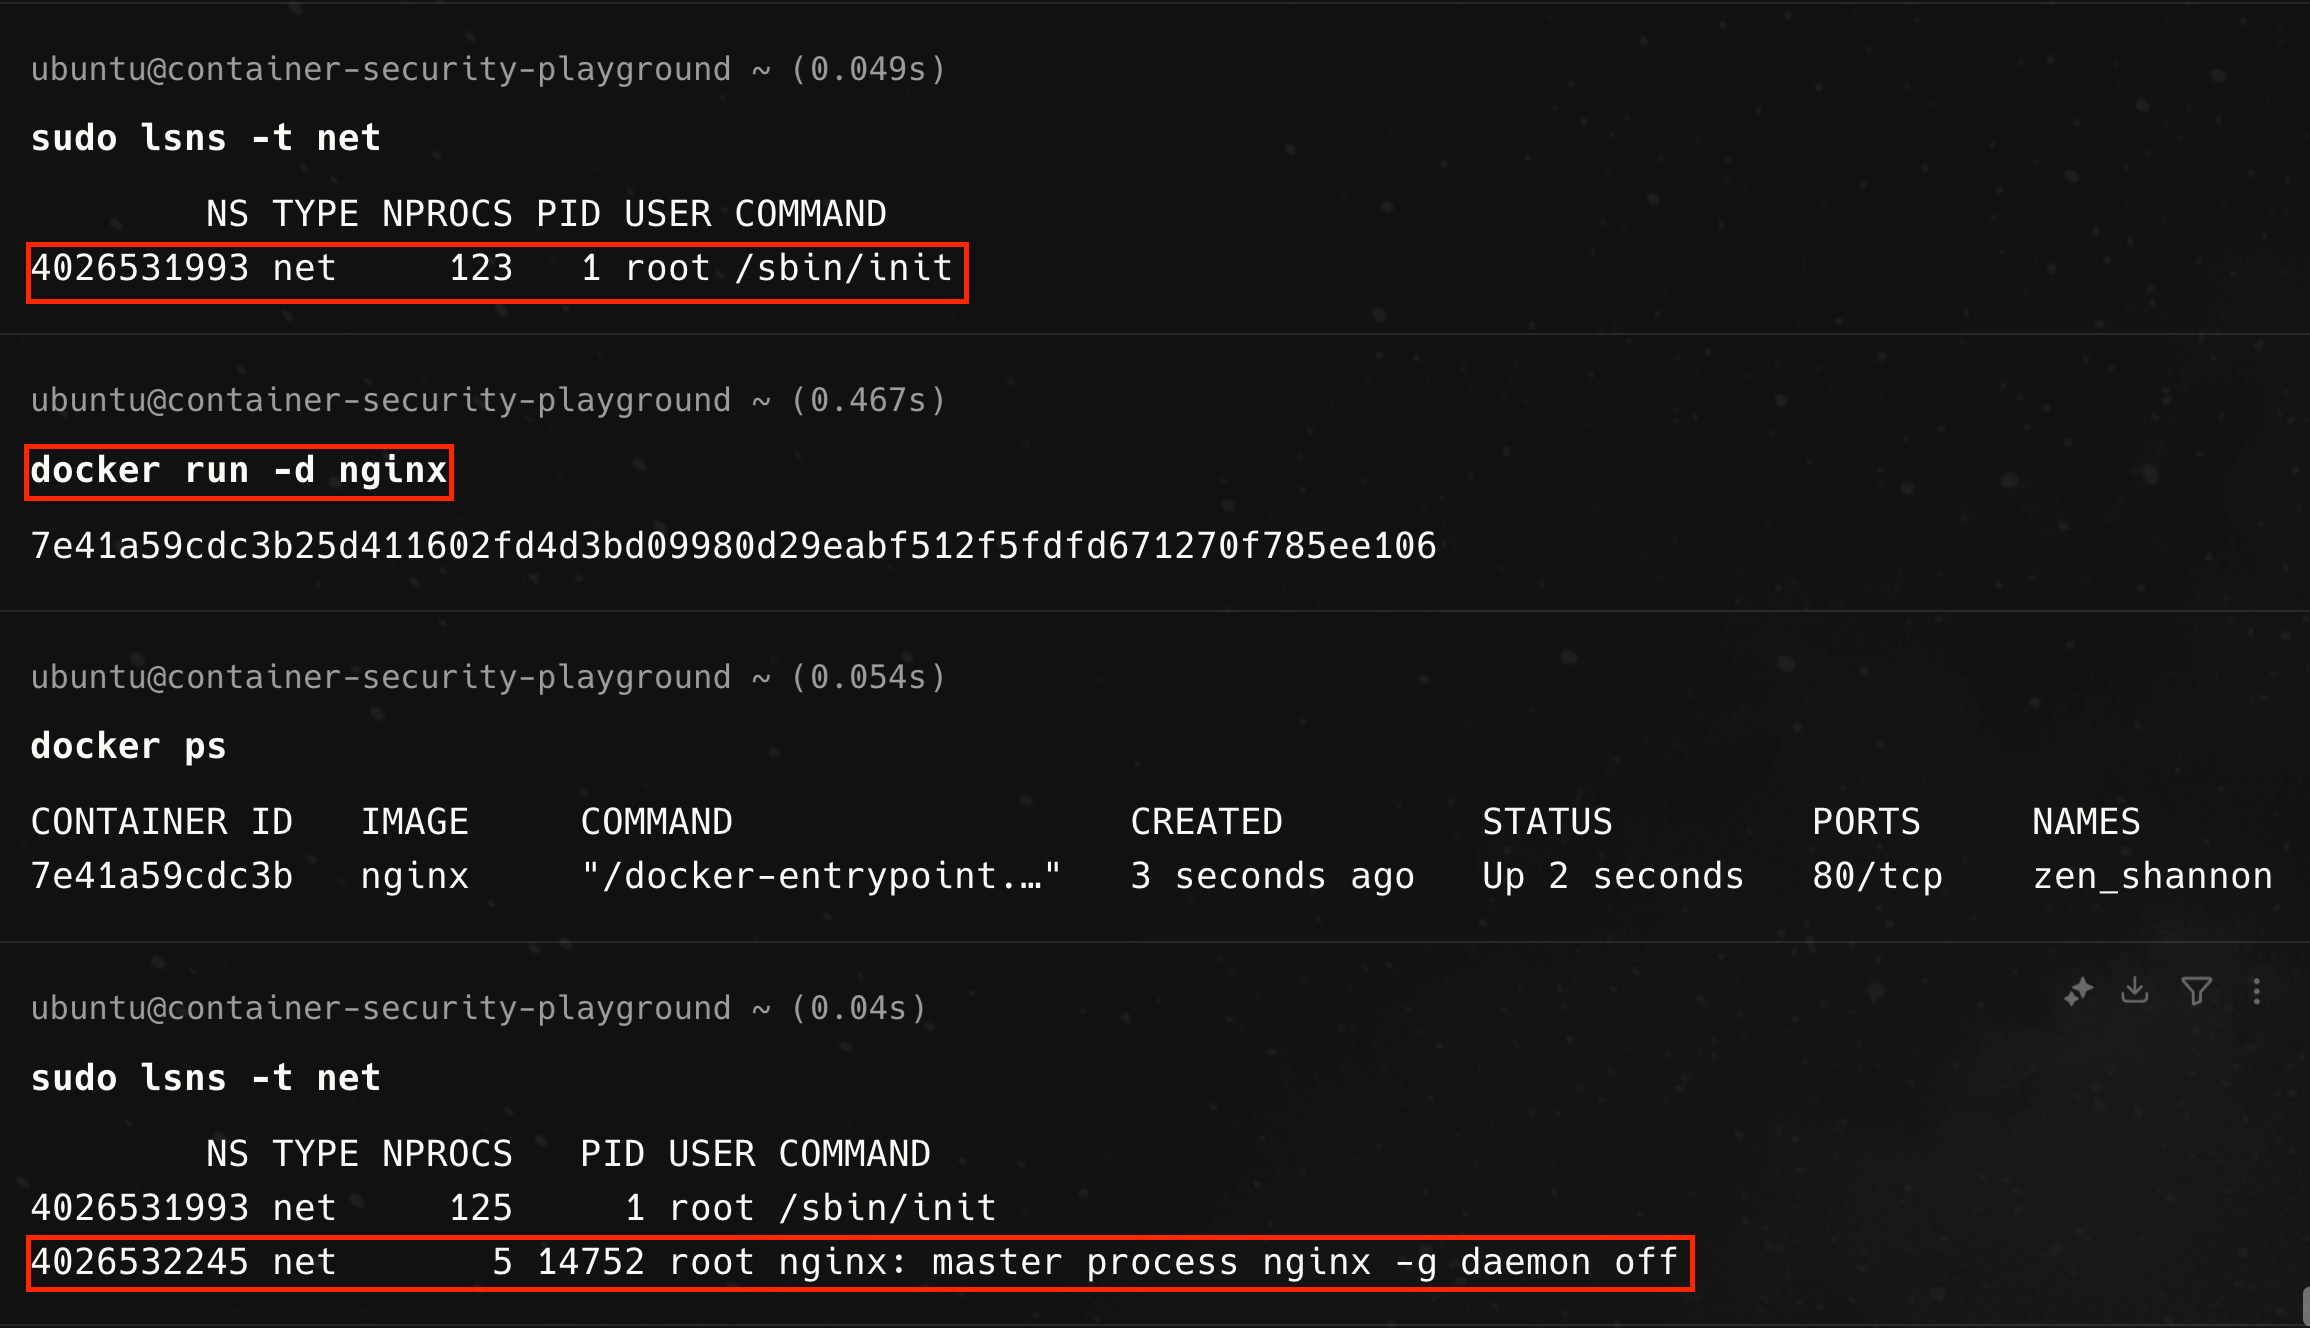
When you launch multiple containers on a host machine with Docker or similar container runtime, by default, each container will effectively have its own set of namespaces, and hence its isolated networking stack.

Say, we run two workload containers using the `docker run` command with the respective images for the nginx web server and a containertools image, created by Rory McCune, that wraps many linux tools useful for debugging containers
The result of running these two docker commands in sequence is that we have two separate containers, each running in its own network namespace (and hence are isolated).
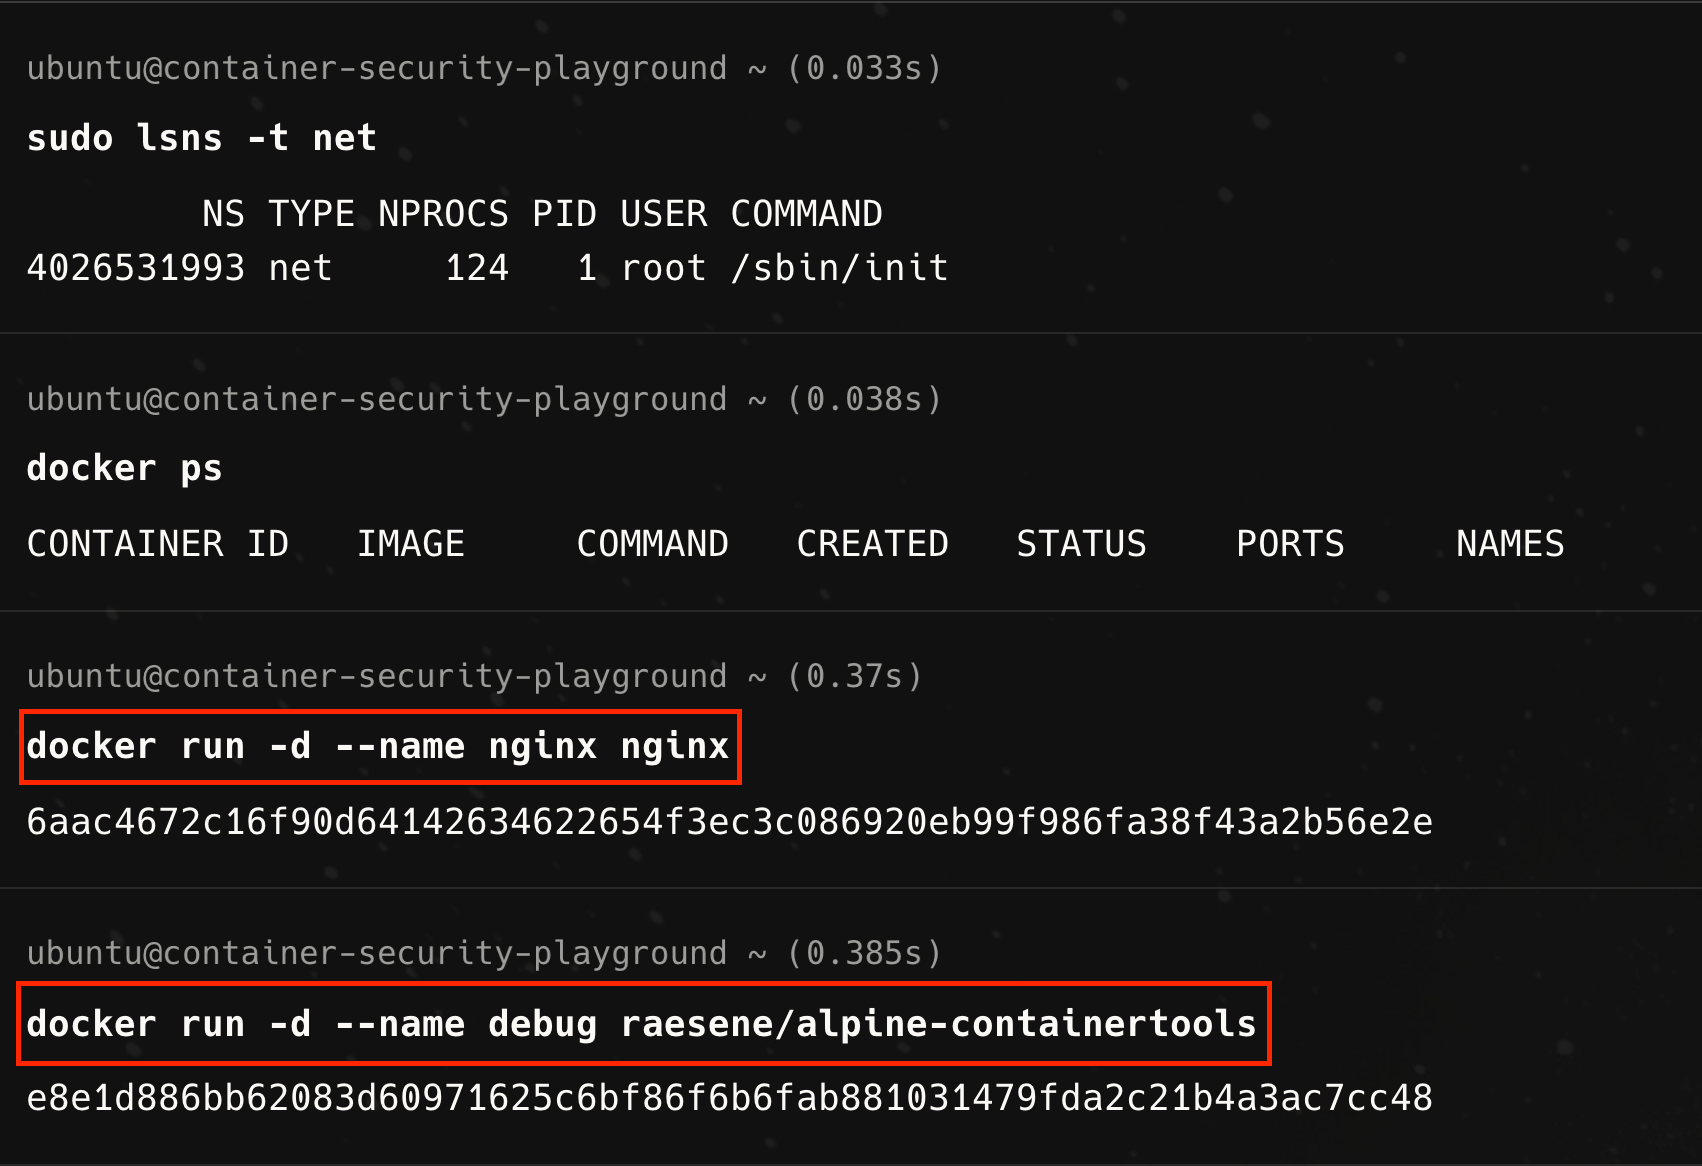
Docker, however, allows to specifying options to join one container to another container’s network namespace, effectively allowing both containers to communicate over localhost.
For reasons that will soon become obvious, let us introduce a third container into the mix. We will first start this special ‘pause’ container. For the subsequent containers, we pass command line options to Docker to join the network (—net=container:pause), process id (—pid=container:pause), and interprocess communication namespace (—ipc=container:pause) of the named the pause container.
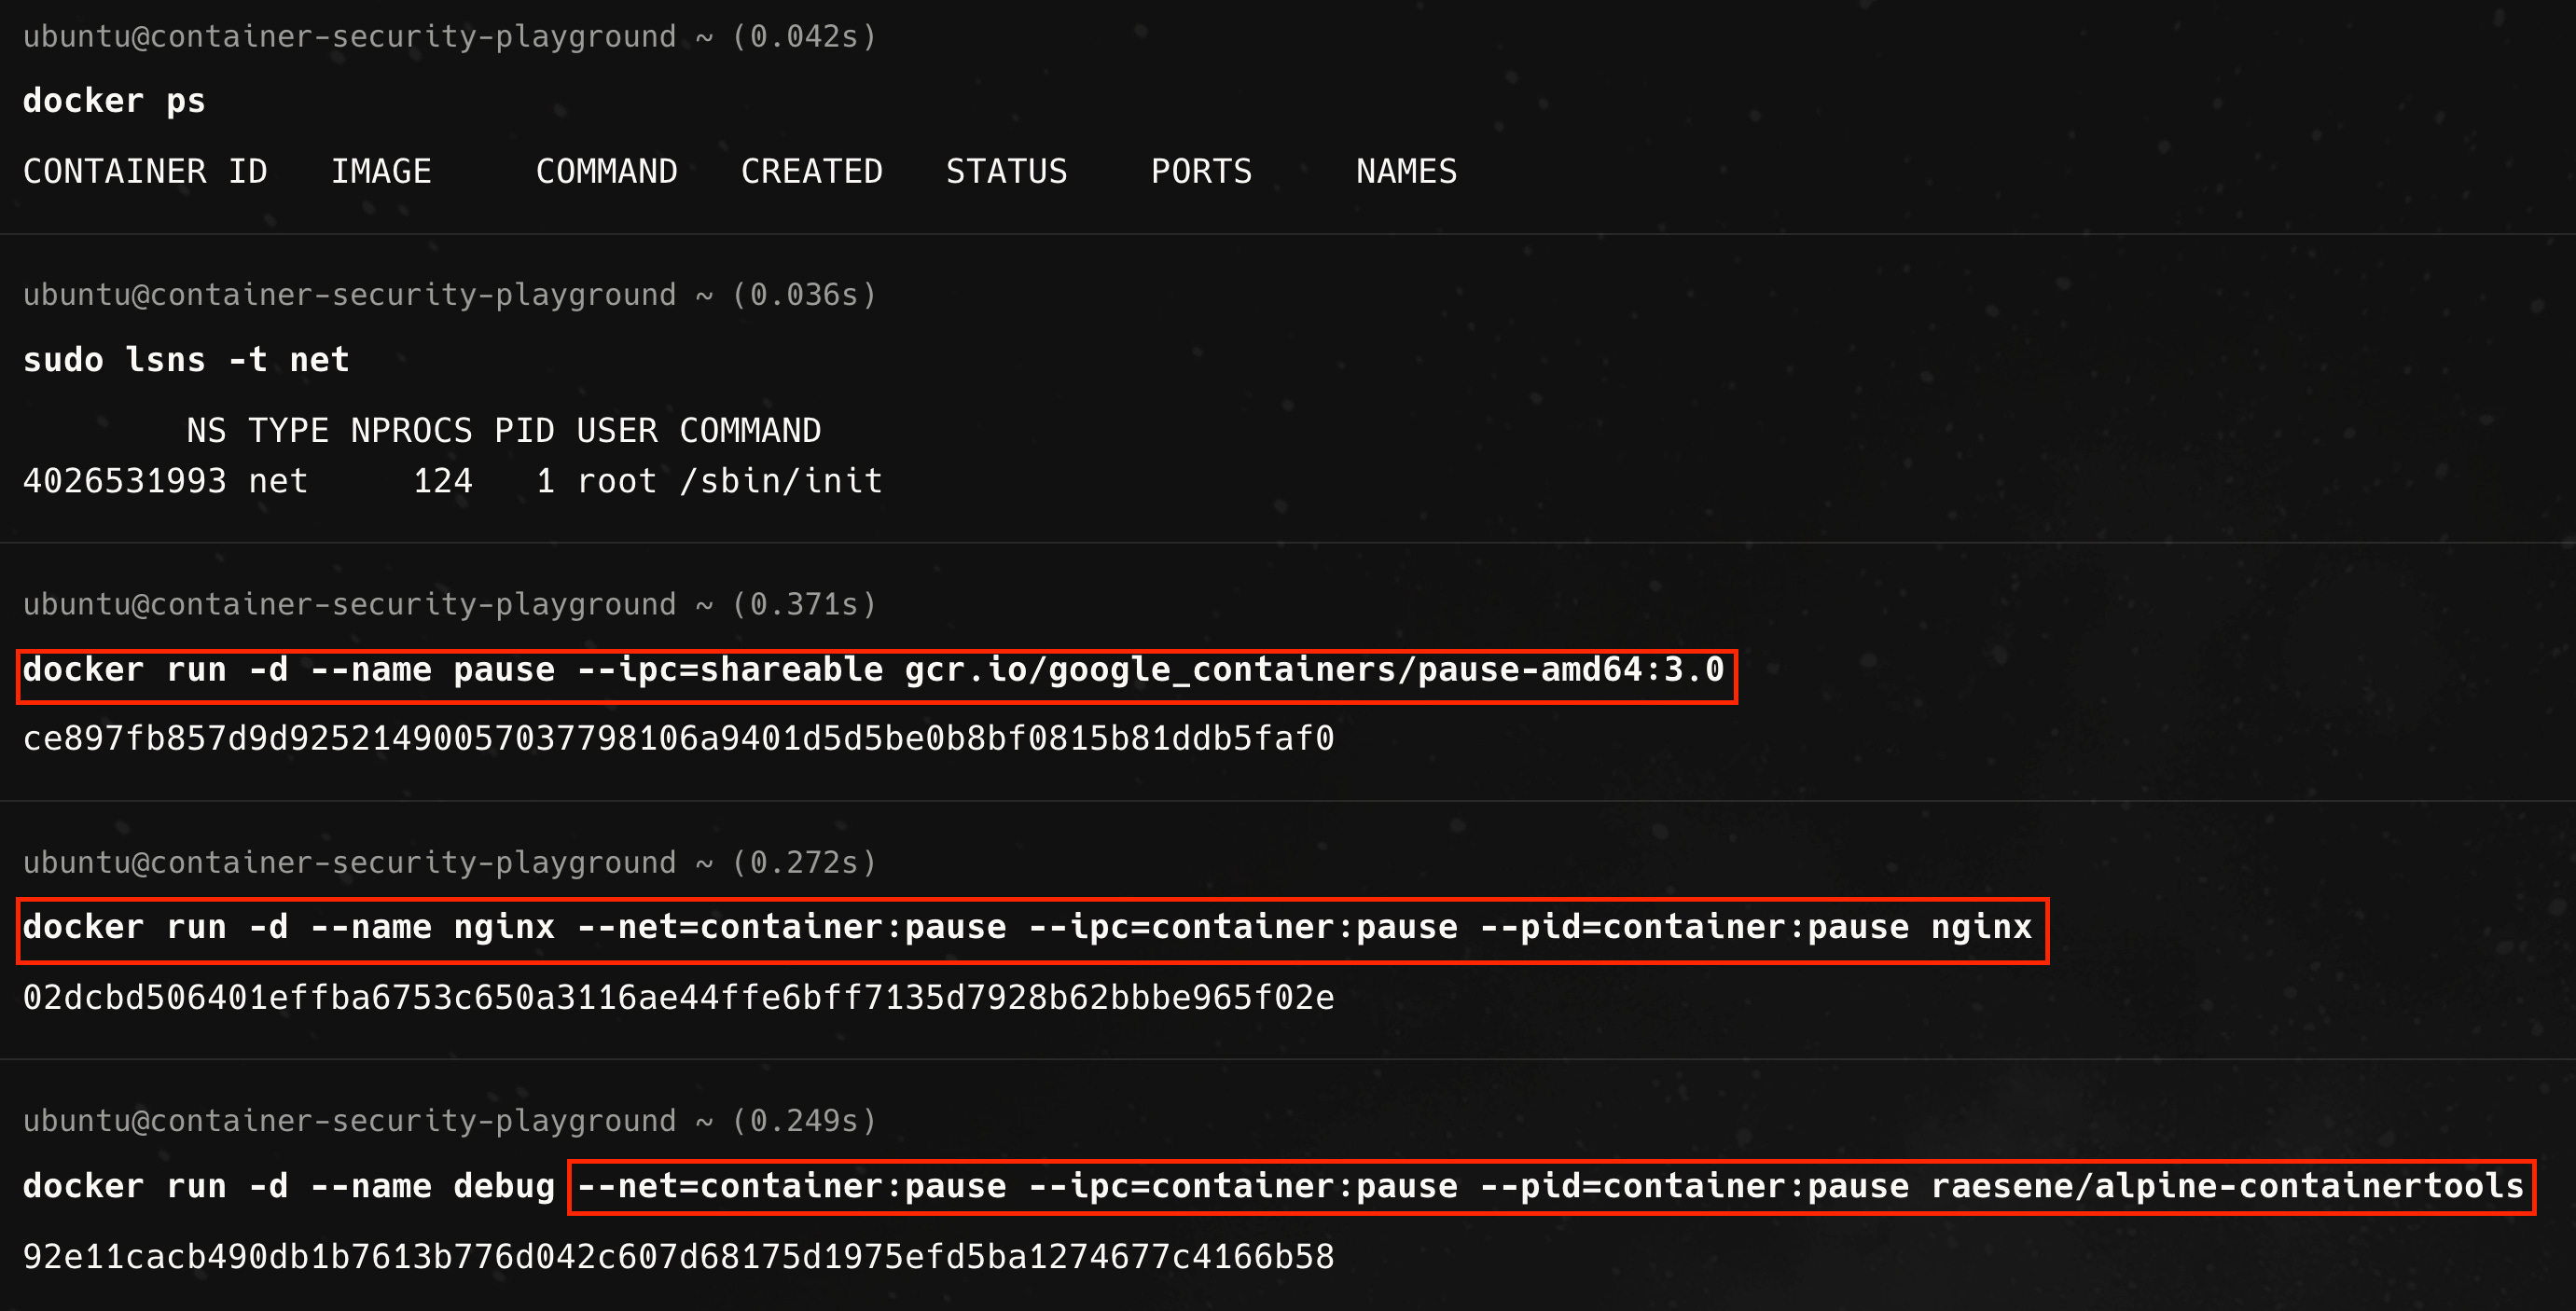
In this case all three containers share the same network namespace owned by the special container, as shown below

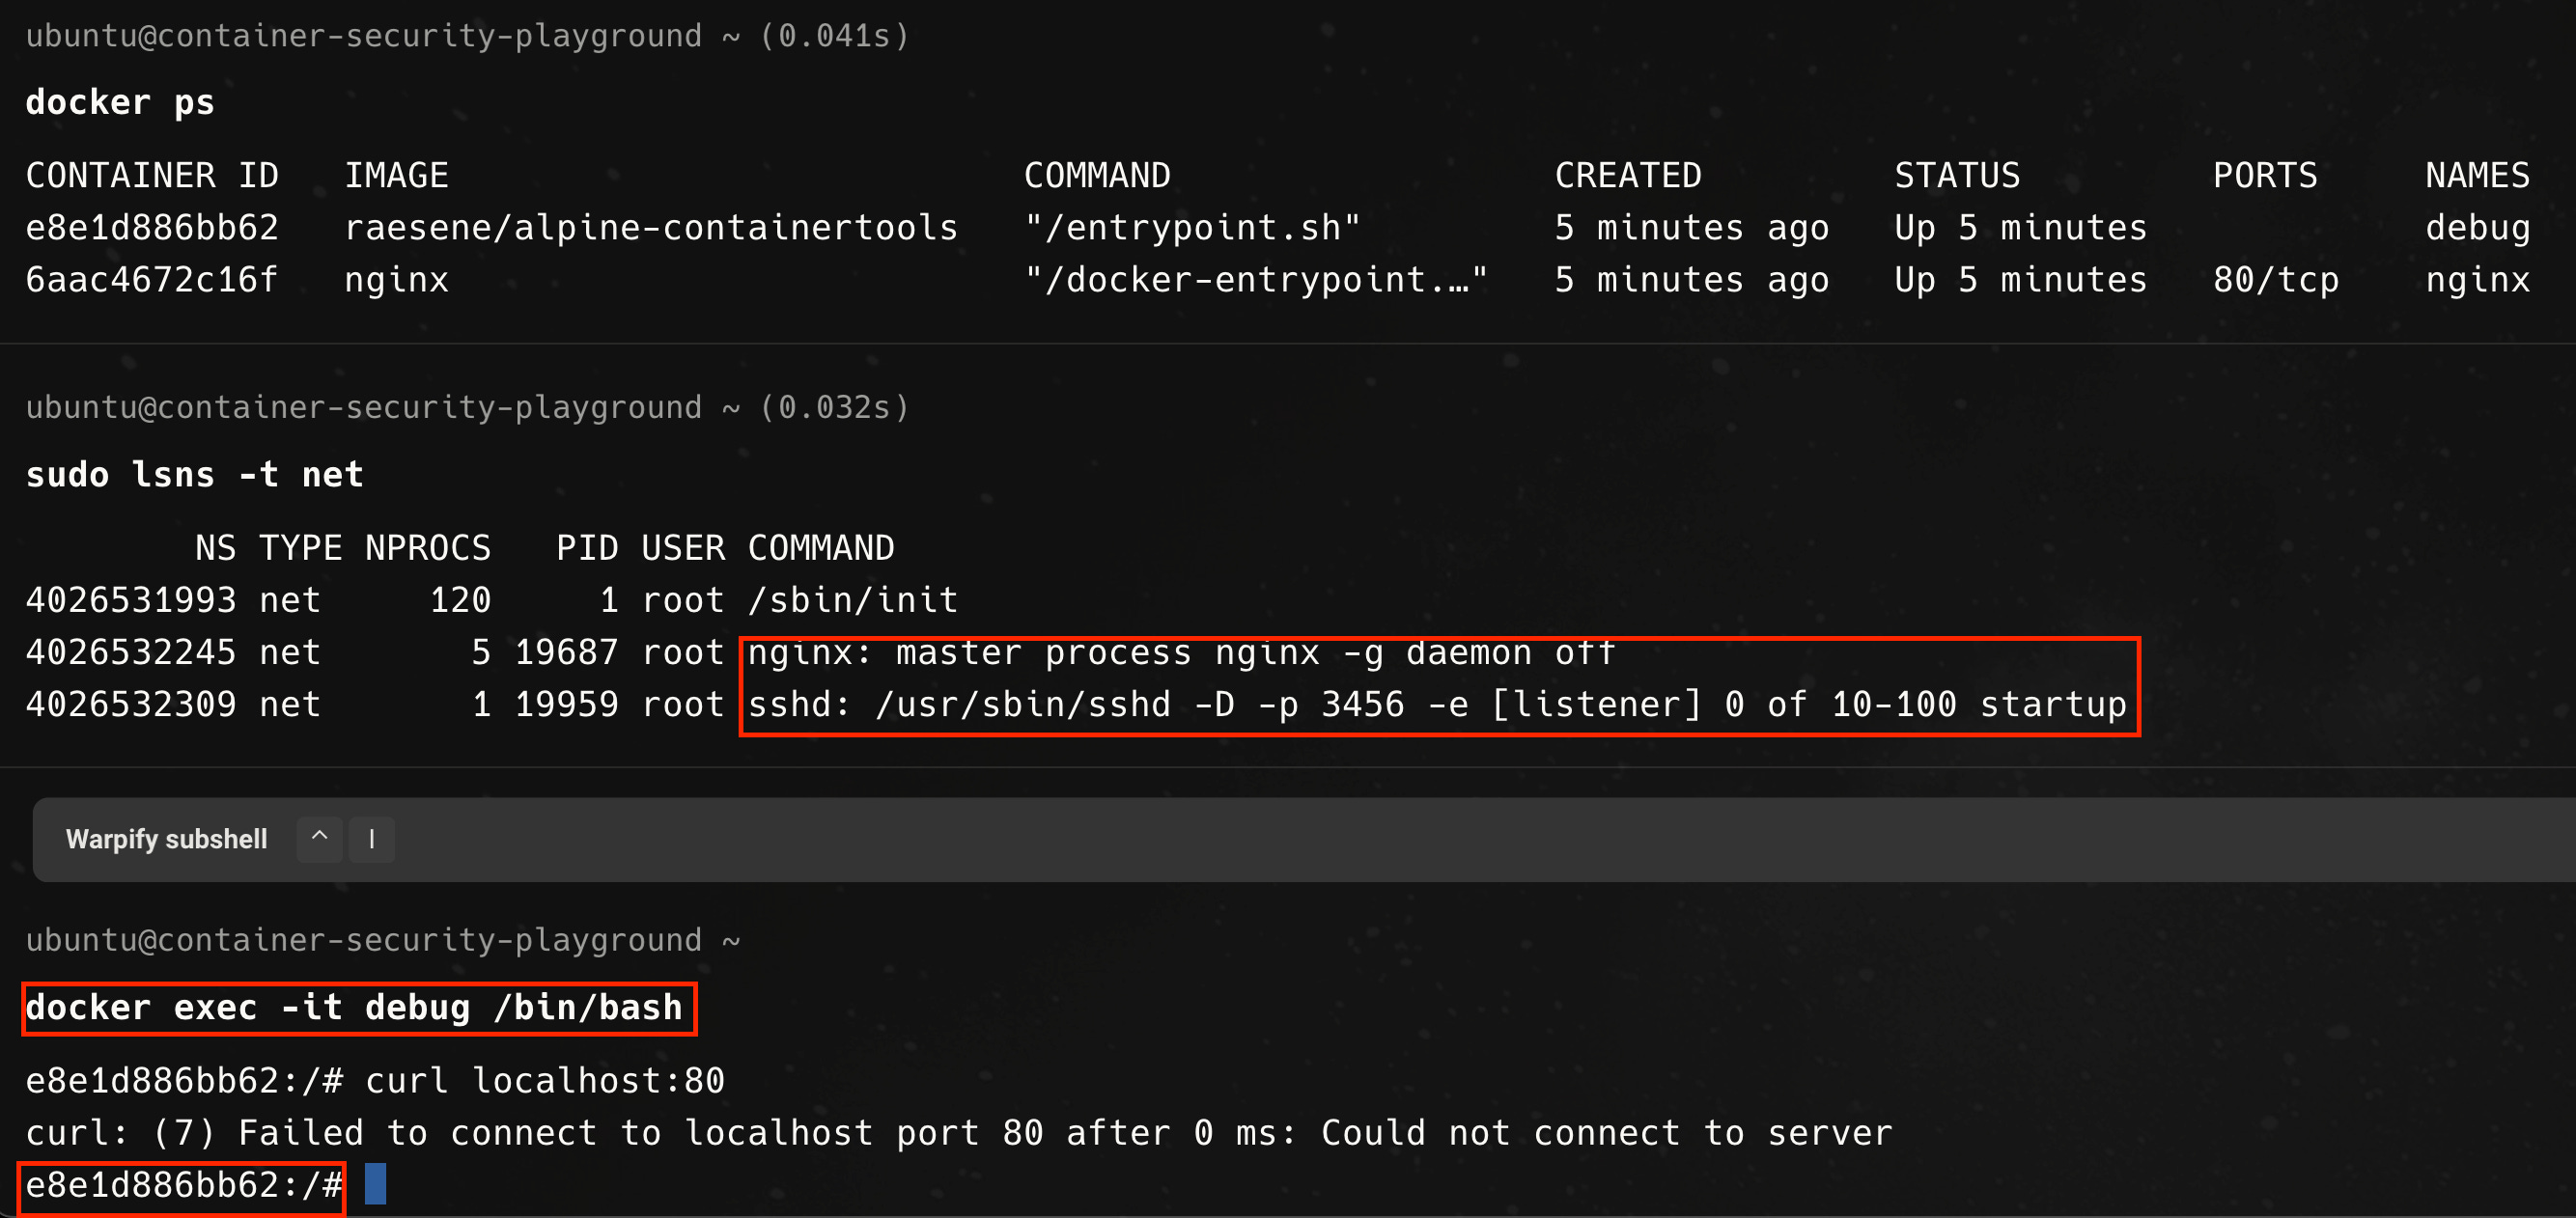
And if we exec to the debug container, we can communicate with the nginx container over localhost, as shown below.

We can even see the nginx master process and its child processes from the debug container, demonstrating that all three containers are sharing the same execution context, due to the flags and arguments we passed to Docker.
Kubernetes Pods and the Need to Share A Network Namespace
Now that we have a good mental model of what containers are under the hood, how they achieve isolation from the host (and each other) using various kernel features and how we can share namespaces between containers in Docker, let us take that knowledge and apply it to Kubernetes. Specifically, we want to understand why there is need for all containers in the same pod to share network namespaces and how the pause container helps to achieve this.
What is a Pod
Kubernetes does not work directly with containers. Instead, the smallest unit of workload you can schedule on a cluster is the Pod. A Pod is one or more containers with shared storage and network resources. Pods are an abstraction layer that enable resource sharing, scheduling, etc. According to Ian Lewis’s famous blog post, “What are Kubernetes Pods Anyway”, Pods “hide the complexity of Docker flags and the need to babysit containers, shared volumes, and the like. It also hides the differences between container runtimes.”
Pods may be run as single-container (i.e. one container per pod) or multi-container (two or more containers) configuration. The multi-container per Pod paradigm can be quite useful when deploying workloads on Kubernetes. A Pod can encapsulate an application composed of multiple co-located containers that are tightly coupled and need to share resources. These co-located containers form a single cohesive unit of service — for example a web server and a log scraper, or one container serving data stored in a shared volume to the public, with a separate sidecar container for updating those files. Deploying these two containers in a single Pod will allow them to share the same execution environment and the same network stack, allowing them to communicate over localhost. They will also share the same Pod IP address.
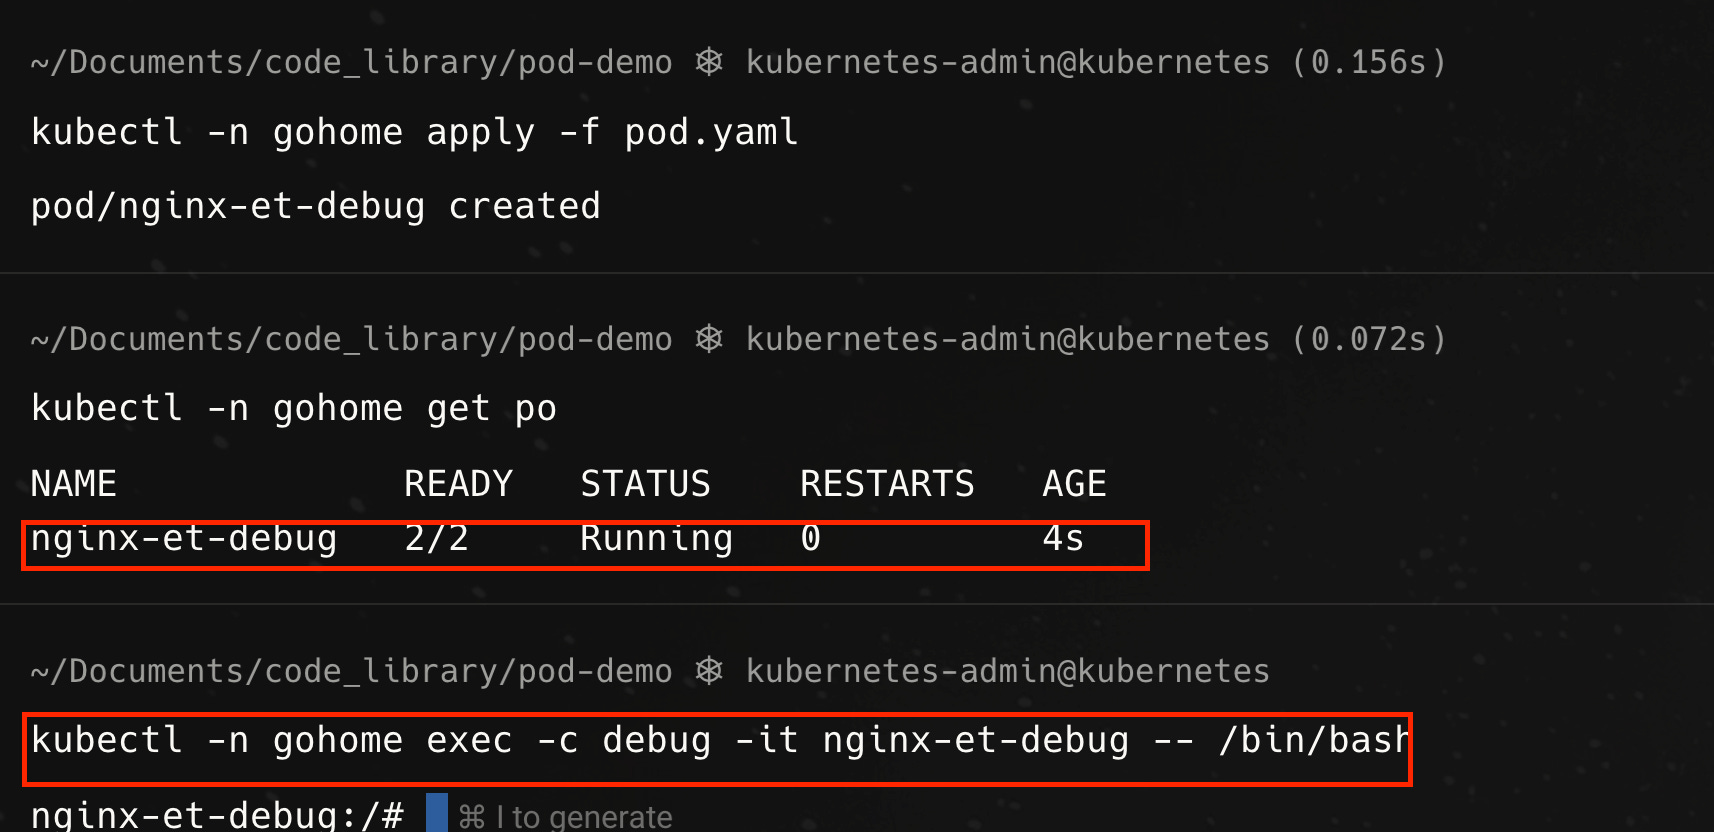
To demonstrate this, let us deploy a Pod with the nginx image and a debugging container, raesene/alpine-containertools, running together, as per the yaml manifest below

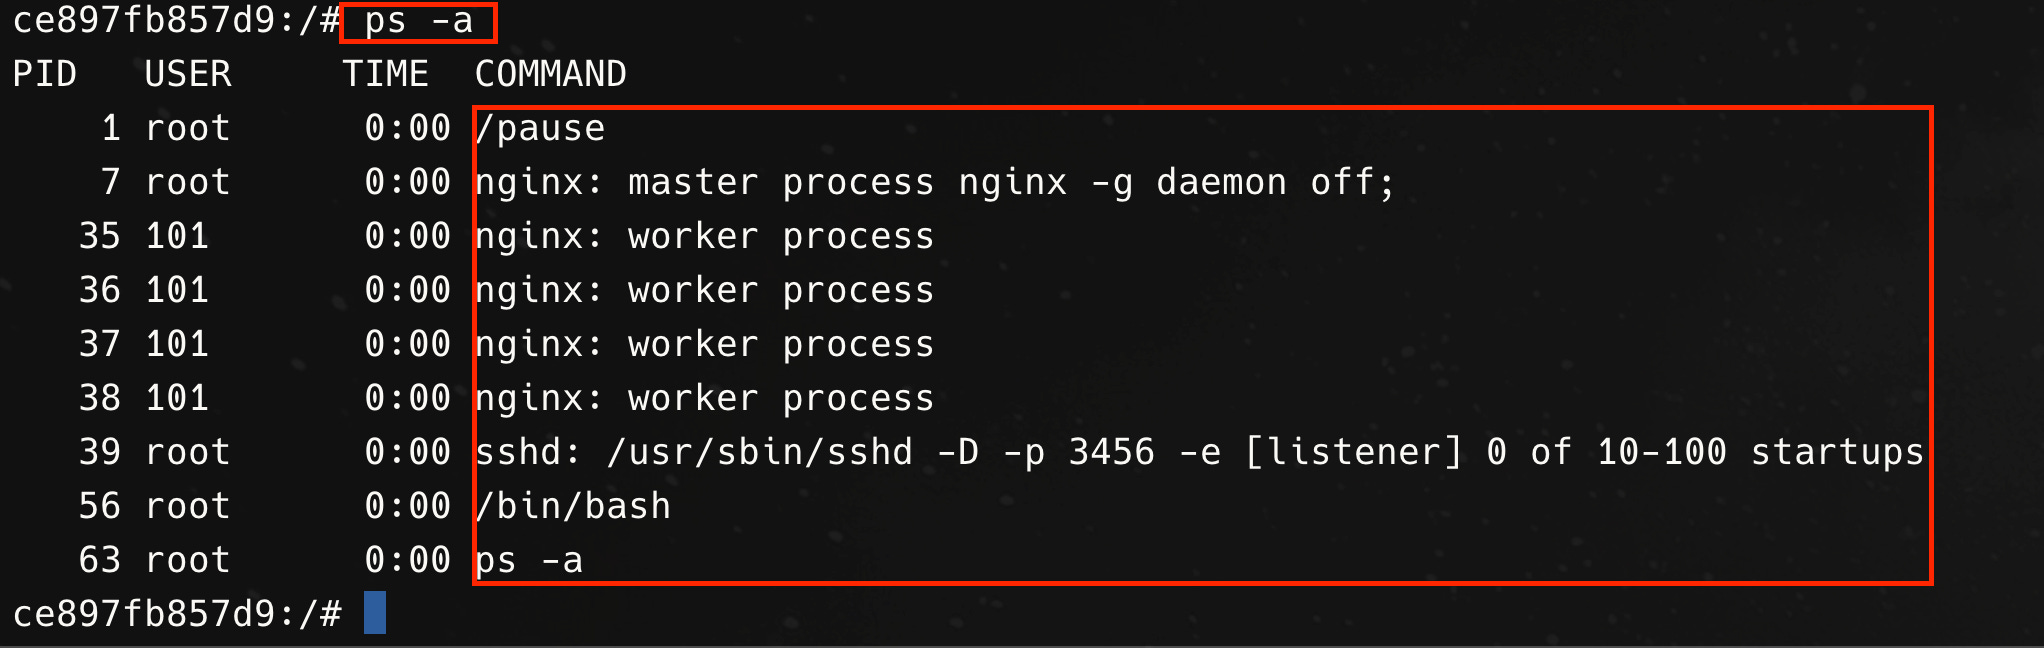
Once we have deployed this pod, we can confirm that all two containers in the pod are running and then exec into the debug container.
When we run ps, we can see all of the processes, including the bash process from our debug container, the nginx master and worker processes and a pause process (more on this in a bit). This is because these processes all exist in the same PID namespace. There is also a single network namespace and all containers share the same hostname.

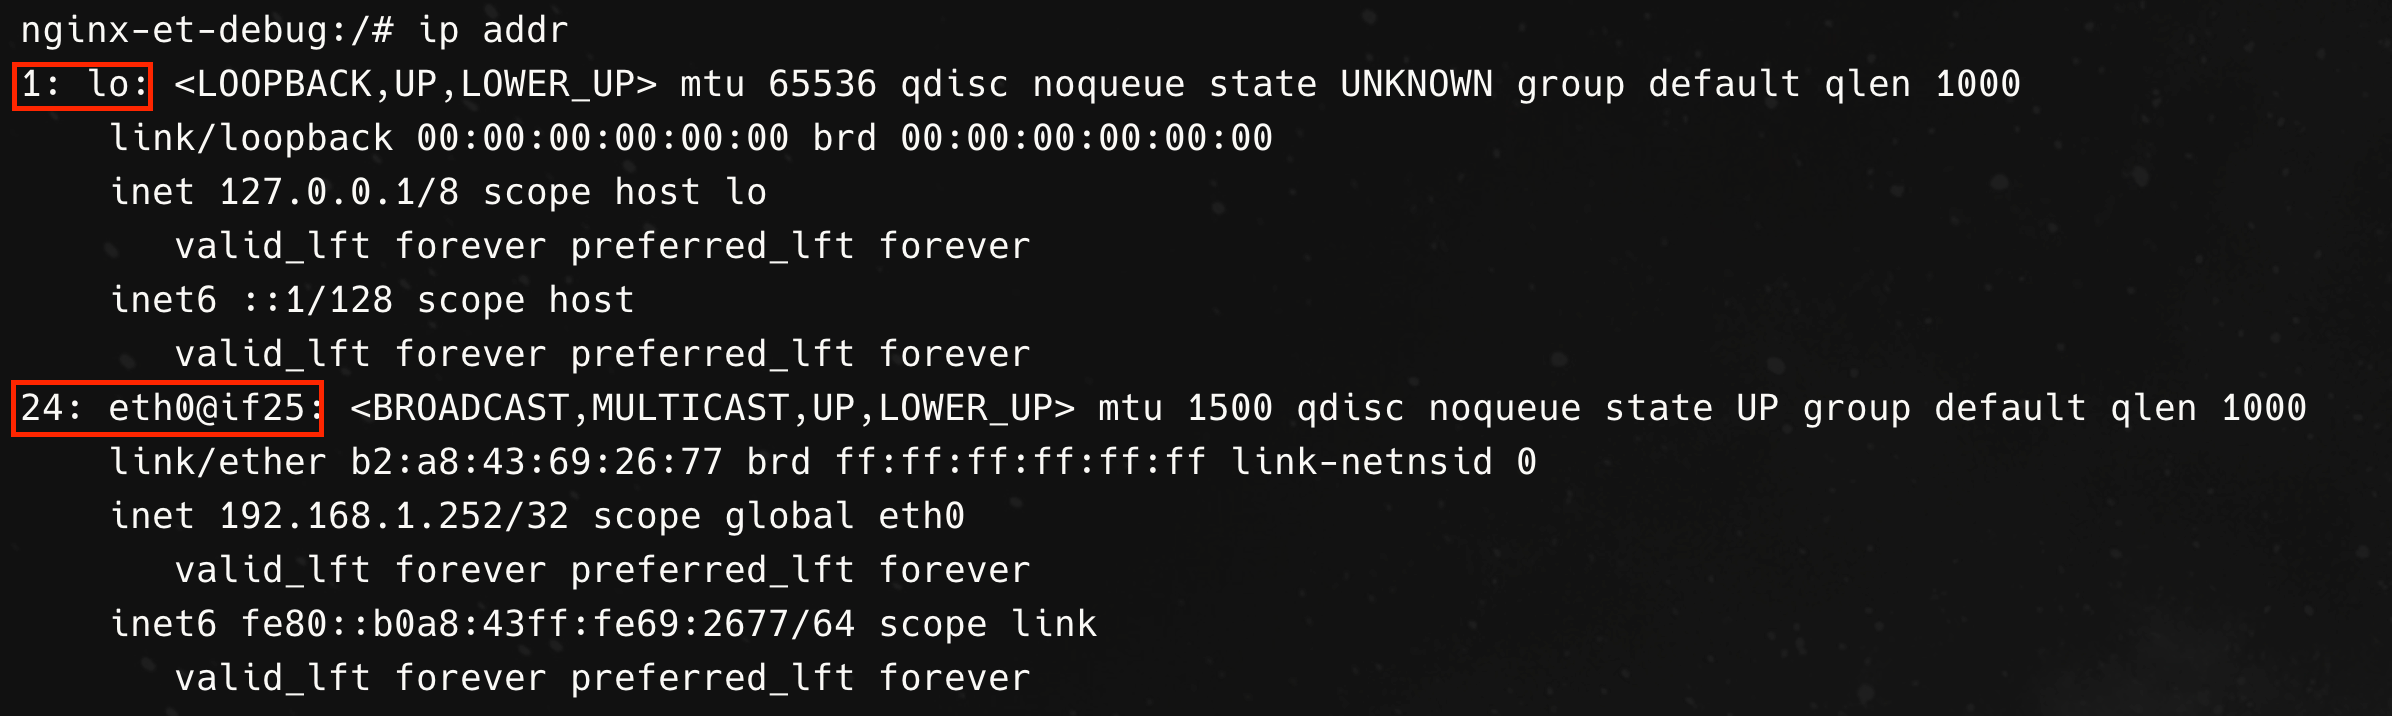
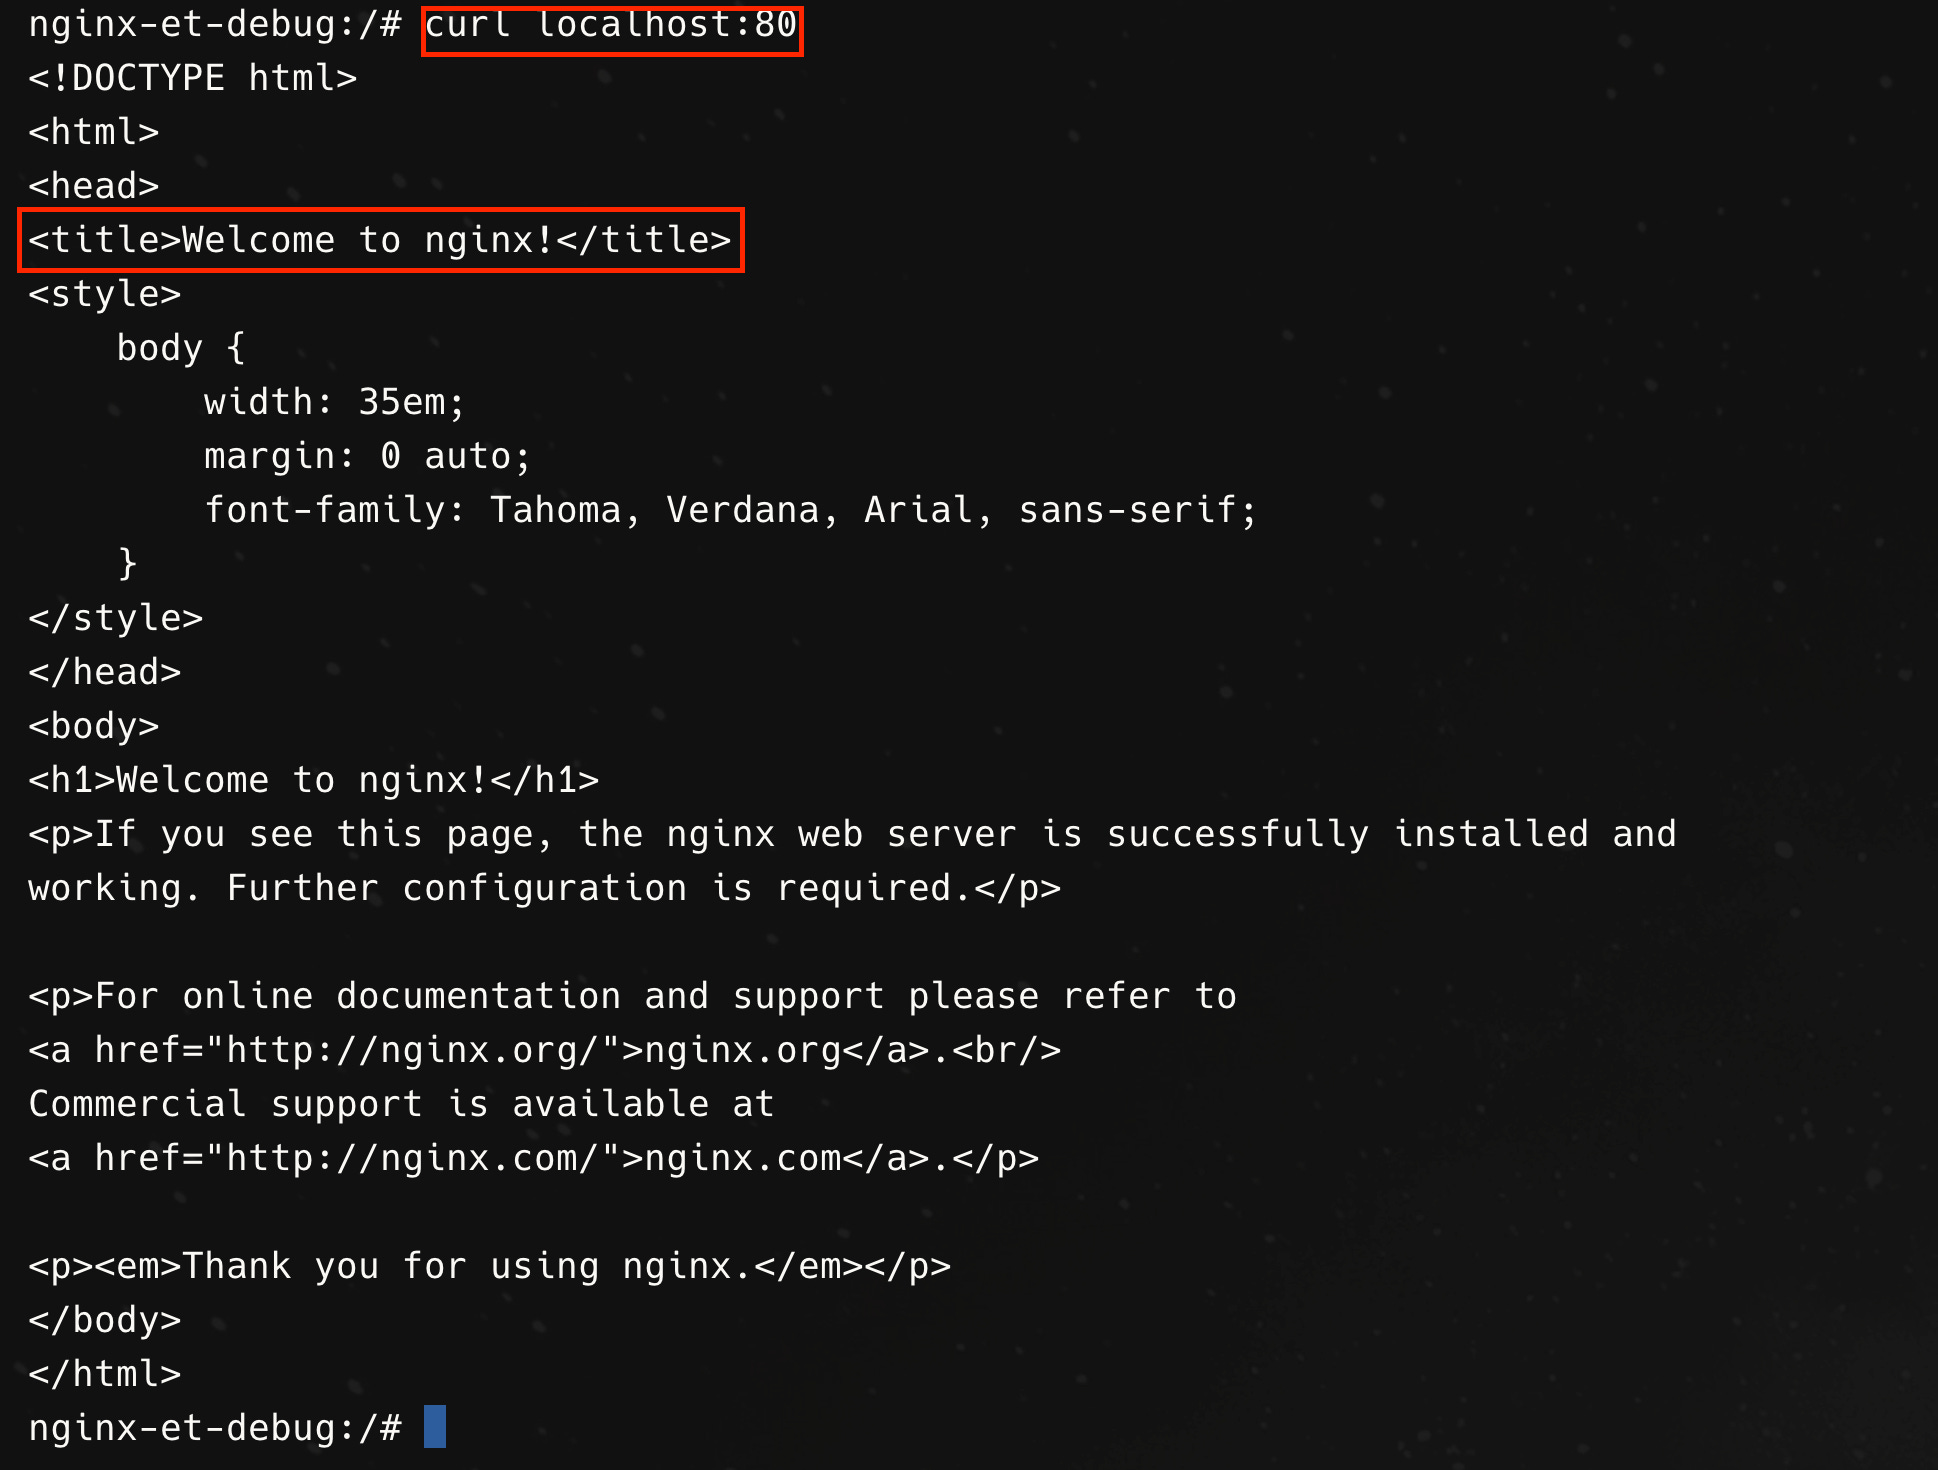
Further demonstrating that the containers share the same network namespace, we see that there is a shared loopback and ethernet interface and that we can communicate with the nginx container from the debug container over localhost.
How does this sharing of context work though? I bet you’re already thinking that perhaps Linux namespaces might be at play here!
Implementing a Mechanism for Pod Network Namespace Sharing
Given the problem of how to get multiple containers that make up a Pod to share the same network namespace, one important constraint to keep in mind is that even though we have multiple containers in a Pod, the containers might not necessarily all start at the same time. In some scenarios, we want one container (an init container) to first start up, do some work and conclude before the second one starts up. Regardless of the sequence in which the containers start, we still want them to share the same network Namespace and other execution context.
One possible approach, given what we know about containers and Linux namespaces, might be to have a dummy container that first starts up with its own network and other namespaces. When the actual workload containers start up, they then join the reserved namespaces. The dummy container serves to reserve the namespaces so that the other containers can join it whenever they start up. By being the first to arrive at the scene, this dummy container/process also becomes PID 1 (or the init process) and hence can clean up any child processes that the workload containers may start and not clean up properly — so-called zombie processes.
If you’ve nodded your head along and thought that this sounds like a reasonable way to go about it, well then congratulations and thank you for inventing the pause container.
(Re)Introducing the Pause Container
The pause container is a container which holds the network namespace for the Pod. You can think of the pause container as the parent container from which other containers in the pod inherit the namespace. The pause container starts, reserves the namespaces, and then goes to sleep.
When creating a Pod, the kubelet, which is the node agent for Kubernetes that is responsible for managing containers, first calls the container runtime interface RuntimeService.RunPodSandbox to create the sandbox environment and set up the execution environment, including the network. Once the Pod Sandbox is established, the kubelet can create user containers in it. When it comes time to delete a Pod, the kubelet will first remove the Pod Sandbox and then stop all the user containers associated with the Pod.
That’s All Cool, but Show Us The Code
Part of the fun of learning about open source system is that you can look at the source code to see how things are actually implemented, so as the final step in our adventure with the pause container, let’s take a look at the source code on the kubernetes github repository. The pause container is part of the other 6 files in the entire Kubernetes repository which contains C code. The repository is mostly Go code.
The implementation of the pause is fairly simple, representing only 68 lines of text, including 15 license of copyright verbiage. The entrypoint or main function for pause.c is shown below

In lines 43 - 49, the function processes the command line argument that are passed to the process and if finds a -v argument, it prints aversion information to stdout and terminates gracefully.
  int i;
  for (i = 1; i < argc; ++i) {
    if (!strcasecmp(argv[i], "-v")) {
      printf("pause.c %s\n", VERSION_STRING(VERSION));
      return 0;
    }
  }
If the pause process is not running as process id 1, it will print a warning message but would otherwise continue execution, as per lines 51- 53. Lines 55 - 62, allows the function to handle interrupt (SIGINT) or terminate (SIGTERM) signals, or a change in state of a child process (SIGCHILD), returning a non-zero response code if any of the signal handling fails
  if (sigaction(SIGINT, &(struct sigaction){.sa_handler = sigdown}, NULL) < 0)
    return 1;
  if (sigaction(SIGTERM, &(struct sigaction){.sa_handler = sigdown}, NULL) < 0)
    return 2;
  if (sigaction(SIGCHLD, &(struct sigaction){.sa_handler = sigreap,
                                             .sa_flags = SA_NOCLDSTOP},
                NULL) < 0)
    return 3;
Below is the implementation of the sigdown and sigreap functions that form part of the signal handling. In the case of a SIGCHILD, the pause process calls waitpid inside of a while loop to reap any zombies when child processes exit (lines 37 - 40)

If no signal are received, the process goes into a pause state inside of an infinite loop and if anything happens to terminate the loop, it prints an error to stdout and returns 42, which is the answer to all that is right and wrong with the world in 2025 (lines 64 - 67)
  for (;;)
    pause();
  fprintf(stderr, "Error: infinite loop terminated\n");
  return 42;